Ethereum Tutorials - Herong's Tutorial Examples - v1.03, by Dr. Herong Yang
One Account for All Ethereum Networks
This section describes one MetaMask account for the main Ethereum network and other test networks.
When you create an account with the MetaMask extension on Chrome, the same account address can be used on the main Ethereum network and other test networks.
You can verify this with these steps:
1. Click the MetaMask icon near the top right corner of the browser window.
2. Select the "Main Network" in the dropdown list on the top.
3. Select "Copy Address to clipboard" from the "..." menu.
4. Paste the account address to an editor:
0xef6Ea9F8Bd78ac42Fb2617ba90846D5785BB320c
5. Select the "Ropsten Test Net" in the dropdown list on the top.
3. Select "Copy Address to clipboard" from the "..." menu.
4. Paste the account address to an editor. You will the account address is the same for both Ethereum networks:
0xef6Ea9F8Bd78ac42Fb2617ba90846D5785BB320c
This is ok, because the account address is just a public key. If you received Ether funds to the same address from both networks, MetaMask can use the same private key to spend them.
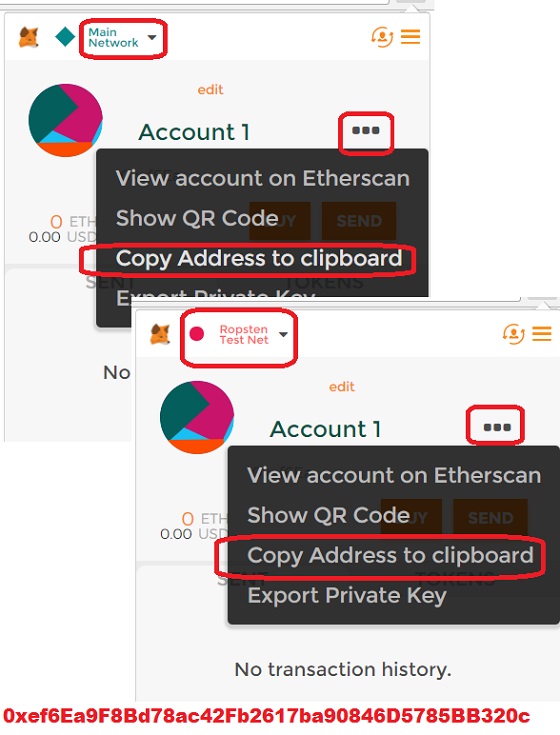
Table of Contents
64-Bit "geth" for Private Ethereum Network
Private Network with Custom Genesis Block
Transferring Funds between Ether Accounts
►MetaMask - Browser Based Ethereum Wallet
Install MetaMask Extension for Chrome
Setup MetaMask Extension for Chrome
►One Account for All Ethereum Networks
Get Free Ether from faucet.ropsten.be
Get Free Ether from faucet.metamask.io
Connect MetaMask to Local "geth" Node
Transfer Ether Fund to MetaMask Account
Send Ether from MetaMask to Private Network Failed
Private Network ID Must Match "chainId"
Send Ether from MetaMask to Private Network
Process MetaMask Transsfer Transaction
Download and Read MetaMask State Logs
View Account QR Code in MetaMask
Export Private Key and Retire MetaMask
Import Private Key to "geth" Account